ArduPilot Software-In-The-Loop (SITL), MavLink, and AirSim
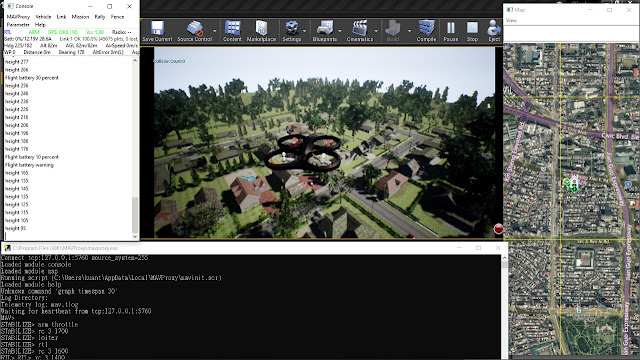
In this article, I would like to share my experience of setting up ArduPilot SITL running with AirSim using Cygwin on Windows. The result is shown in the picture below. I hope this post can be complementary to the original AirSim SITL tutorial Using SITL with AirSim.
First of all, let's see the architecture of AirSim SITL:
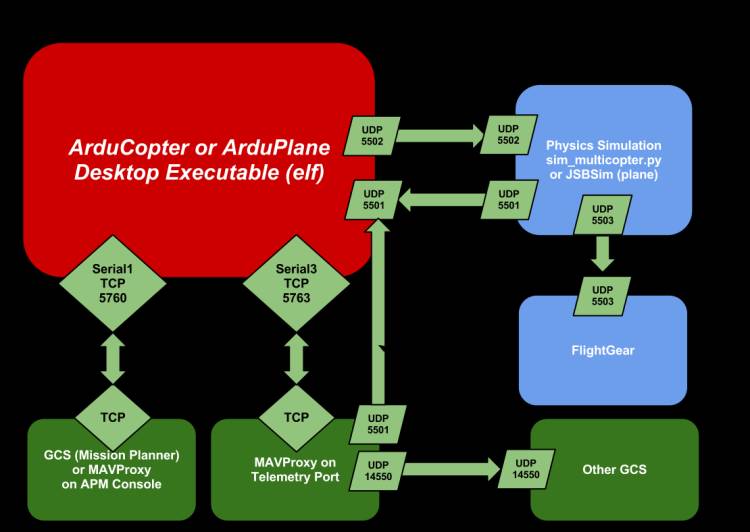
The red block represents SITL, which connects to physics simulator (blue block), which is AirSim, and a Ground Control System (GCS), which is MAVProxy in our case. So we will run three programs that communicates with each other through TCP/IP.
Now we are ready to run the simulation. The major steps are listed below:


First of all, let's see the architecture of AirSim SITL:
The red block represents SITL, which connects to physics simulator (blue block), which is AirSim, and a Ground Control System (GCS), which is MAVProxy in our case. So we will run three programs that communicates with each other through TCP/IP.
Now we are ready to run the simulation. The major steps are listed below:
- Git clone ArduPilot and build it under Cygwin. You can follow ArduPilot tutorial (link) or see my summary at the section (Run SITL using Cygwin).
- Install Unreal and git clone AirSim and build it, OR download pre-built AirSim precompiled binaries (link)
- Edit “Documents\AirSim\settings.json”, note the default folder is your Windows document folder. (AirSim Settings)
- Go to UE4 editor Menu -> Edit -> Editor Preferences, Uncheck the "Use Less CPU when in Background"
- Run AirSim environment, the UE4 editor will stuck and wait for SITL connection.
- In Cygwin shell, switch your folder to “ardupilot/ArduCopter/”
- Run the SITL script
sim_vehicle.py -v ArduCopter -f airsim-copter --console --map

Control Your Drone
Once you connected to your drone, you can use the MAVLink Command Console to control your vehicle. However, we need to understand the ArduPilot control mode first. The modes are:
•mode auto
-Enter AUTO
mode, starting with the first waypoint.
•mode loiter
-Enter LOITER
mode around the UAV’s current position.
•mode rtl
-Enter Return
to Launch mode.
•mode manual (stabilize)
-Enter manual
mode. On ArduCopter this is
equivalent to STABILIZE mode
•guided
-Fly to the
last clicked point on the map, or specified longitude and latitude. Requires an
altitude: guided ALTITUDE or guided LAT LON ALTITUDE
The Remote Control (RC) channels are defined as follows:
• Channel 1: Roll input.
• Channel 2: Pitch input.
• Channel 3: Throttle input.
• Channel 4: Yaw input.
We can use manual mode to fly the drone vertical, and use loiter and let it stay in the air. The commands are:
- arm throttle
- rc 3 1600
- loiter
The 2nd command "rc 3 1600" means we set throttle to 1600 rad/s. Note the it needs to be > 1500 rad/s to takeoff in my case, or the drone will stay at ground. The screenshot below is the example of running the commands in MAVLink console.

Now your drone will loiter in the air. We can use command "alt" to report the current height of the drone.

Control Your AirSim Drone Remotely using Another Computer through TCP/IP
The "sim_vehicle.py" script does two things: (1) build the ArduCopter SITL simulator, and (2) run MAVProxy. Therefore, we can run MAVProxy remotely on one computer, and control the AirSim drone running on another computer. Suppose AirSim and SITL will be run on the same computer 1 (192.168.0.1) and MAVProxy will be run on computer 2 (192.168.0.2). The steps are:- Run AirSim
- Run SITL
./build/sitl/bin/arducopter --model airsim-copter --defaults ./Tools/autotest/default_params/copter.parm
- Run MAVProxy
mavproxy.exe --master "tcp:192.168.0.1:5760" --sitl "192.168.0.1:5501" --map --console
Run SITL using Cygwin
Finally, I summarize the steps of building and setting up SITL in Cygwin. You can also follow the original tutorial in ArduPilot (link). Another way is to use Windows Subsystem for Linux (WSL).
-setup-x86_64.exe
-P autoconf,automake,ccache,gcc-g++,git,libtool,make,gawk,libexpat-devel,libxml2-devel,python27,python2-future,python27-libxml2,python27-pip,libxslt-devel,python27-devel,procps-ng,zip,gdb,ddd,python2
-At last step,
click “Add path to environment variable”
4.Install required Python packages
-pip2 install
future empy pyserial pymavlink
5.Git clone ArduPilot
-cd ardupilot
-git submodule
update –init –recursive
7.Add “[Your Root]/ardupilot/Tools/autotest/” in
your Cygwin path
- vi ~/.bashrc
Add this line at this end of .bashrc. Please modify the path to meet your ArduPilot installation folder.
- export PATH=$PATH:/cygdrive/c/Projects/ardupilot/Tools/autotest/:/cygdrive/c/Program\ Files\ \(x86\)/GNU\ Tools\ ARM\ Embedded/6\ 2017-q2-update/bin/Add this line at this end of .bashrc. Please modify the path to meet your ArduPilot installation folder.
8.cd [Your Root]/ardupilot/ArduCopter
sim_vehicle.py
-v ArduCopter -f airsim-copter
--console –mapAirSim "settings.json"
{
  "SettingsVersion": 1.2,
  "LocalHostIp": "127.0.0.1",
  "LogMessagesVisible": true,
  "SimMode": "Multirotor",
  "OriginGeopoint": {
    "Latitude": -35.363261,
    "Longitude": 149.165230,
    "Altitude": 583
  },
  "Vehicles": {
    "Copter": {
      "VehicleType": "ArduCopter",
      "UseSerial": false,
      "DefaultVehicleState": "Disarmed",
      "UdpIp": "127.0.0.1",
      "UdpPort": 9003,
      "ControlPort": 9002
    }
  }
}

Comments
Post a Comment